There are many instances when you get a service call for an Image quality problem. You probably dread these calls because it can be very difficult to troubleshoot. I am going to go over some troubleshooting tips as well as a brief description of how Image Intensifiers work, life cycle, and replacement procedures.
Image Intensifiers compose of five major components. The input phosphor, photocathode, focusing lens, anode, and output phosphor. The input phosphor is typically made of cesium iodide and it converts the X-ray photons to light. The light protons then hit the photocathode which converts the light protons to electrons. From there the electrons go to the electrostatic focusing lens which pushes the positive charged electrons together creating kinetic energy of the negatively charged electrons. From there a high positive voltage is applied to the anode which accelerates the electrons to about 90,000 miles per second. Those electrons then hit the output phosphor which converts the electrons back to light. The output phosphor is made of silver activated zinc cadmium sulfide or what is more commonly referred to as P20.
Your Image Intensifier has its own power supply which is applied to the electronic lenses inside the II. When using a magnification mode a smaller area is used on the input phosphor which gives the effect of zooming or magnifying the image. When magnifying, a higher patient dose is required in order to maintain a constant brightness level to the output phosphor. If you check your dose at each mag mode you will notice an increase in dose as you step up your magnification. Dose rates are set differently on all manufacturers’s and are done at each mag mode to ensure Image quality throughout the various degrees of magnification. As your II degrades in time, the dose rates may need to be adjusted to improve Image quality. Proper judgment should be used to determine if increasing patient dose to improve Image quality is within FDA guidelines and patient safety.
A common image quality problem is burn-in. This can occur on your II, camera tube, or monitor. The easiest way to check your monitor is to hook up an external video source to see if the burn-in is still present. From there you can take your camera off from the II and see if the burn-in is still present coming directly off the objective lens of the II (Take proper precautions to prevent exposure). If it is present there then your II is the source of the artifact and should be replaced. If all is good there then you can point your camera at the wall and see if your burn in is still present. If it is then your pickup tube is more than likely the culprit.
The hardest problem to correct is resolution. Poor resolution can be caused by many things including a bad power supply, incorrect focusing voltages for II, electronic focus (non CCD), or camera focus. The first step is to determine if the problem appears at all mag modes or just one. If it appears on all mag modes then remove the camera and check the image off of the II to see if the image is still poor. If it is then your II power supply is defective and should be replaced. If it only happens at one mag mode then you might be able to correct the problem by changing your focusing voltages for that mag mode on your II power supply. The adjustment procedure for this varies by manufacturer so be sure to check your manuals before attempting, or call for support. The problem could also be your camera focus which can be either adjusted mechanically or through the service software depending on the manufacturer.
If your problem is seeing detail in the image or poor contrast then there are a few things to check. First, make sure your monitor is adjusted correctly using an external video source. Next, make sure your automatic brightness control is working properly. With nothing in the field your KV and mA should be very low. (Typically 40-60 KV, and below 1 mA). If your KV and mA are increasing with nothing in the field then your ABS is not functioning properly and needs to be addressed. KV and mA should increase as you go to a higher mag mode. You can also check this by switching to manual technique and lowering the KV and mA to see if image quality improves. If you do not have a CCD camera then the beam current on your pickup tube could be low. This would cause poor contrast and images would appear white with lack of detail. Refer to service manual or call us for support on calibration of beam current as it varies from system to system.
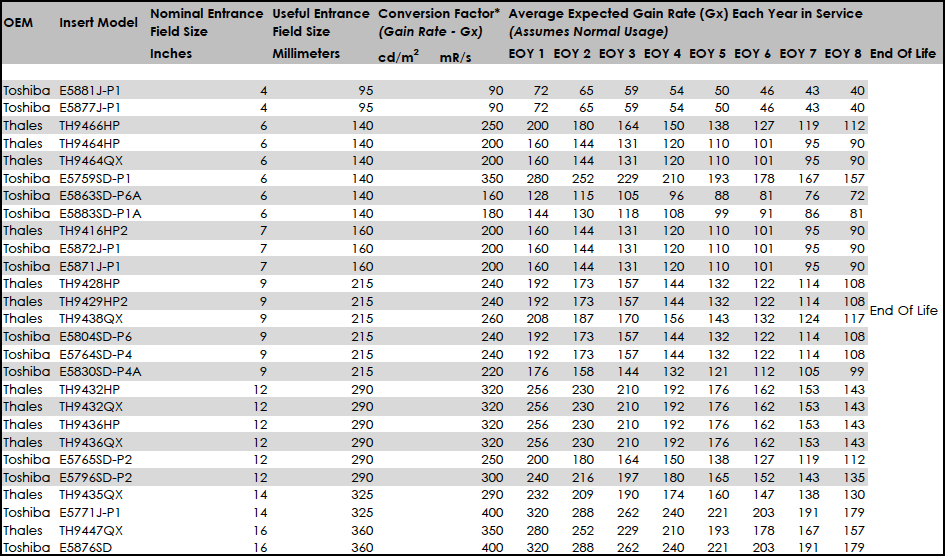
There are many other Image quality problems you may face. As always, call us for any support you may need. I have included an estimated II depreciation chart below to show average life span and degraded gain rates over each year of usage. We can also include installation on any II that you purchase. Good luck!
Dustin Zimmerman


